

- HandPunch & Software
- OATS Compliance
- Guard Tour System
- Brochures/Manuals
- Request A Repair
- Refurbished Units
- Request Clock Parts


Can't find what your looking for? Call us. We can help.
(718) 784-4900
 To view these files, please download the latest version of Adobe Reader.

Time & Attendance Systems Support
- Biometric Help
- HandPunch Help
- Software Help
- Biometric FAQ
- Support Contracts
Face Recognition Help:
Q&A Facts:
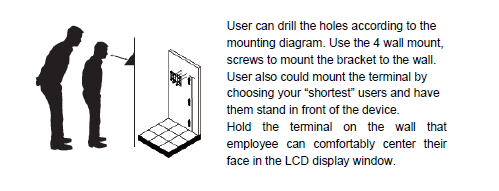
Q: Can you enroll users if unit sitting on table or does it have to be mounted on wall ?
A: The clock should be mounted. When using more than one, pains should be taken to insure they are all the same level. When enrolling, I recommend putting a spot or something on the ground so people know where to stand.
Q: When SY-910 face recognition clock receives a good punch , is there any indicator displayed on LCD screen to let employee know it was a good punch ?
A: Yes - it gives a checkmark icon & a cheerful chime sound
Q: Can you enroll user at one clock and push template to several clocks through software ?
A: Employees can enroll at one clock and use that template at other clocks without re-enrolling.
However, to make the usage easier on the employee, insure the clocks are at the same heights with the same distance away from the clock to stand.
Basically, customer has to recreate the way they were enrolled to punch.
Q: If someone tries to punch in twice within 5 minutes what happens ?
A: Already Punched message gives a yellow exclamation point icon. The 2nd punch gets ignored.
Q: Can SY-910 Face Recognition Unit ring bells ?
A: Yes, but programmed at clock directly via keypad !
I know they are talking to the developer to attempt to get them sent from the software.
Q: What happens if someone not enrolled tries to punch at SY-910 face recognition clock ? Any noise or anything displayed on screen or does it just time out ?
A: First time you attempt to punch and not enrolled it will time out by default. However you can change it by going to Menu> System Settings> Security> Alarm> Rejection Alarm ON - there is a rejection time (meaning you can set it to 1-3, for the attempts for the alarm to go off).
HandPunch Help:
Simple Troubleshooting Guidelines if HandPunch is Not Working:
- Poll clock one last time to get all punches in clock currently downloaded to Time and Attendance software.
- Check calibration scores at the clock. (Write them down) »How?
- Clean the clock with Windex (platen, side mirrors & under nose of clock/black plexiglass where the camera takes picture through) – all external parts.
- Reset clock and perform a cold boot (Unplug power cord from clock and plug it back in, all while holding down the little white button in back of clock). Let it restart, thenselect option "Cold Boot."
- Check calibration scores once again at the clock (Write them down & compare)
[Note:A good calibration scores is: (R)+/-2, (C)+/-2, (E)90-120] - Try to recreate the initial problem.
- If problems persists, contact us at (718) 784-4900 to get a loan unit from us. (Must be under support contract)
Cleaning the HandPunch
Inspect and clean the HandPunch regularly to maintain optimum performance. Clean the platen, side mirror, reflector, and the window above the platen using a clean cloth dampened with ordinary, non-abrasive window cleaner (see Figure 8-1). Start at the rear corners of the platen and work your way forward.
DO NOT SPRAY CLEANING FLUID DIRECTLY INTO OR ON THE HANDPUNCH.
Enroll a new employee:
- To get entry to password level Press: "Clear" and "Enter"
- Enter your supervisor ID, followed by the "Enter" key (if prompted)
- Place hand for verification
- Press "4", then "#"
- "Enroll Employee" Displays - Press #
- Enter the Employee ID, followed by the "Enter" key
- Place Hand 1/3 (remove hand)
- Place Hand 2/3 (remove hand)
- Place Hand 3/3 (remove hand)
- The new employee is now enrolled
Enroll a new supervisor:
- To get entry to menus, press: "Clear" and "Enter"
- Enter your supervisor ID, followed by the "Enter" key (if prompted)
- Place hand for verification
- Press "4", then "#"
- Press"*" Once
- "Enroll Supervisor" Displays - Press #
- Enter new supervisor ID, followed by the "Enter" key
- Place Hand 1/3 (remove hand)
- Place Hand 2/3 (remove hand)
- Place Hand 3/3 (remove hand)
- The new supervisor is now enrolled
Enter IP Address in Clock:
- To get entry to password level Press: Clear and Enter
- Enter your Supervisor ID, followed by the Enter key: XXX then Enter
- Place your hand for verification
- Enter password followed by # key: 2#
- Press (*) to skip set language
- Press (*) to skip set date format
- Press (*) to skip set date and time
- Press (*) to skip set address
- Press (*) to skip set id length
- Set Serial: Press #
- Verify/Enter IP Address (make sure to use all 3 numbers in each octet) Example: 192.168.001.105
- Verify/Enter Gateway (make sure to use all 3 numbers in each octet) Example: 192.168.001.001
- Verify/Enter Host Bit 9600 Baud: Press #
Change Time on Your HandPunch
- Make sure your computer time is correct
- Open Time and Attendance Software
- Go To "Polling"
- Check Option: "Set Clock Date & Time"
- Click "Poll"
- Your HandPunch Time should now be correct
HandPunch Literature:
TA100 Pro/Genesis Pro Help:
Add New Employee To Software
- To add an employee, click on the Employee icon, or select Daily Operations, then Employee. This will open the Configure Employee Screen.
- In the Configure Employee screen, press the Detail tab to change to the Employees Details.
- Click the Add button at the bottom of the window to add a new employee.
- All the fields will be blank, with the Hire date and the Fiscal date set to the Current system date.
- Enter a unique employee number and the employee’s personal information. Make sure to check the Hire and Fiscal dates. Assign the employee to a Division, Group and Holiday Group (if in use). If the Benefit Accrual Module is installed, assign the employee to an Accrual Rule. If the PC Clock is installed, check the box to assign the employee. All information can be added or changed at a later date with the exception of the Employee Number.
- Add any Comments then click OK.
Change Time on Your HandPunch
- Make sure your computer time is correct
- Open Time and Attendance Software
- Go To "Polling"
- Check Option: "Set Clock Date & Time"
- Click "Poll"
- Your HandPunch Time should now be correct
Software Literature:
TA 100 Pro
Genesis Pro |
Frequently Asked Questions (FAQ)
- What is biometrics?
- What is Hand Geometry?
- Is Hand Geometry new?
- How does it work?
- What is Buddy-Punching?
- Why HandPunch?
- How many hand templates can be stored in the unit?
- Do rings or Band-Aids have an effect?
- What happens if I injure my hand and have it bandaged or in a cast?
- My employees are concerned about hygiene issues. How do I address this concern?
- Are there any privacy issues?
- Is the HandPunch safe?
- Who is Schlage?
Q. What is biometrics?
A. Biometrics identifies people by a unique human characteristic. The size and shape of a hand, a fingerprint, the voice and several aspects of the eye are just some unique attributes. “The word "biometric" simply means the measurement of a living trait, whether physiological or behavioral. Biometric technologies compare a person's unique characteristics against a previously enrolled image for the purpose of recognizing.”
Q. What is Hand Geometry?
A. HandPunch uses a field-proven technology called hand geometry, which verifies an individual’s identity based on the size and shape of the hand. It does not take fingerprints or handprints.
Q. Is Hand Geometry new?
A. Hand Geometry has been in use longer than any other biometric. Two-dimensional hand geometry devices have been around since the 1970’s. Schlage has sold over 300,000 HandPunch HandReaders since 1986.
Q. How does it work?
A. The HandPunch measures the unique size and shape of the fingers and hand. Over 90 different measurements are made such as, length, width, thickness and surface area. No finger prints or palm prints are taken.
To enroll an employee for the first time, the employee would put their hand into the HandPunch three times so that a CCD camera records 3 images of the hand. An algorithm converts these images into one mathematical value (Your template). This template is then stored in the HandPunch. Each time an employee puts their hand in the HandPunch to punch in or out of work, the HandPunch takes another image of the hand, the algorithm converts this image to a mathematical value and then compares this new template with the template the HandPunch has stored previously. If the two templates match, identity is confirmed and the punch is recorded.
Each time an employee punches in or out, their template is updated with each successful verification. Basically the machine “learns your hand”. This allows for changes due to weight gain or loss, aging, etc. This also eliminates the need to re-enroll users.
Q. What is Buddy-Punching?
A. Buddy punching is when one employee clocks in for another employee. This usually happens when one employee is running late. That employee will then call into work to ask a coworker/friend to clock them in at their scheduled time to report to work. This is the basis for payroll fraud that costs companies thousands of lost dollars per year.
Q. Why HandPunch?
A. Badge-based terminals eliminate many of the problems associated with manual time and attendance systems. But there’s one issue that remains: “Buddy Punching,” the practice of employees clocking in other employees who are not at work. HandPunch HandReaders stop buddy punching because, unlike badges and cards, the hand can’t be lost, stolen, or loaned to another person.
Q. How many hand templates can be stored in the unit?
A. Up to 32,512. HandPunches hold from 100 employees up to 32,512.
Q. Do rings or Band-Aids have an effect?
A. Not usually enough to reject a valid user. Just make sure the ring is in the upright position and hand placement is proper and there should not be any issues.
Q. What happens if I injure my hand and have it bandaged or in a cast?
A. You can be enrolled with your left hand; palm up while the right hand is disabled. It’s not as comfortable but will work fine.
Q. My employees are concerned about hygiene issues. How do I address this concern?
A. Compare hand placement on the platen to using a door knob/handle, money handling, telephone use, or shaking hands. As of June 2007, every handreader platen (Where user places their hand) contains an anti-microbial agent. These active agents are incorporated during the manufacturing process and because they cannot leach out or wash off the surface, remain active for the life of the biometric reader. This material does not change the look or the feel of the product but it continually protects the platen’s surface against microbes, making it cleaner and more hygienic.
Q. Are there any privacy issues?
A. Hand geometry technology has never been reverse-engineered to identify people. Hand geometry units do not store the image of the hand, but instead store a 9-byte template which is a mathematical representation of the hand image. This mathematical value is meaningless to other devices. In addition, no fingerprint or palm print information is gathered.
Q. Is the HandPunch safe?
A. The infrared lights used in the hand reader are similar to those used in remote controls for TV’s and VCR’s. The light’s power level is less than the amount produced by natural sunlight. Schlage has submitted handreader information to the U.S. Occupational Safety and Health Administration (OSHA). OSHA did not report any hazards.
Q. Who is Schlage?
A. With Over 300,000 HandPunches installed around the world, Schlage is part of a $10B/year corporation that's been in business for over 100 years.
Annual Hardware Support Contract Information
|
Annual Software Support Contract Information
|
Amano Time Stamp Systems
ATVS, TS-3000i, Pix3000xNT, Pix3000xN
- TS3000i Help
- Pix3000xN(T) Help
- ATVS Help
- Support Contracts
Frequently Asked Questions (FAQ)
Do I have to connect my TS-3000i® TimeSync Web Clock directly to a computer?
No. The TS-3000i® TimeSync Web Clocks are connected directly to a network Ethernet connection. They are never connected physically to your computer.
Will the TS-3000i® work with a dial-up internet connection?
No. The TS-3000i® requires a high speed (broadband) internet connection.
Do I have to create a configuration profile to setup my TS-3000i® Web Clock?
No. Your TS-3000i® comes with a default configuration profile. However, in order to customize your TS-3000i® Web Clock to your requirements, you must first create a unique configuration profile to provide some basic information, like a user name, password, email address, time servers, etc.
Do I have to provide an e-mail address to setup my clock configuration profile?
Yes. But only if you want e-mail notification. When setting up your TS-3000i® clock configuration profile for e-mail notification, you are asked for a from and a to e-mail addresses. This enables the TS-3000i® Web Clock to automatically direct alerts to these destination addresses, if you choose to enable them.
Do I have to create a new configuration profile each time I get another TS-3000i® Unit?
No. One configuration file is all that is needed for multiple clocks. The shared configuration file can be copied to multiple TS-3000i® clocks using the utility that came with the clock CD.
Do I have to connect the TS-3000i® directly to my computer to configure it?
No. A direct connection is not needed between the computer and the TS-3000i® for configuration. Configuration is completed using the TS-3000i® Web page via a browser, see www.amano.com/time for additional support.
Do I need to have my TS-3000i® connected to the internet at all times?
Yes. If you are using an external NIST NTP Time Server.
The TS-3000i® normally works by regularly requesting and receiving time validation from one of the 18 default NIST NTP Time Servers via the internet. This requires the TS-3000i® to be connected to the internet at all times. However, if this is not possible, you can configure the TS-3000i® to validate time by connecting to an internal Time Server (see Time Sync Time Servers).
No. If you lose Internet [time server] connection, the TS-3000i® will maintain the time for up to 24 hours before notification of time sync validation. Also, if a schedule should occur during the Internet connection failure, time sync validation failure will occur.
If I lose my internet connection, will I lose my time data on the clock display?
No. As long as you retain AC power and/or have the FPR option, the TS-3000i® will remain fully operational with time data displayed on the clock. However, if the Internet connection is lost for greater than 24 hours you will be notified on the clock display of time synchronization failure. The display is updated at regular intervals (depending on the schedule selected) and maintains its time data until a new time validation is performed. If the TS-3000i® loses its connection to the internet, the data will be updated again when the connection is restored.
How long does the built-in coin battery last in my TS-3000i® Unit?
Estimated built-in coin battery life for an average TS-3000i® Web Clock is 5 years.
How often does the time get validated and updated on my TS-3000i® clock?
A minimum of once every 24 hours, with a maximum of 12 times per day, or once every 2 hours.
Will e-mail alerts work if my internet connection is interrupted?
No. The TS-3000i® only needs to have a connection to the network to produce e-mail alerts.
If the power goes out, will my TS-3000i® Web Clock still receive updates?
As long as the internet connection is live and you have the FPR option, the time validation updates will continue.
If the power goes out, and my TS-3000i® Web Clock does not have the FPR and/or PoE options will I lose my clock configuration and/or transaction reports?
No. All clock configuration and transaction reports are always stored in flash memory.
If the power goes out, and my TS-3000i® Web Clock does not have the PoE and/or FPR option will I lose Time and Date?
No. The rolling calendar in the clock is maintained for up to 1 year by a built-in coin battery.
If the power goes out, and my TS-3000i® Web Clock has the FPR option will I still be able to print?
Yes. The Full Power Reserve (FPR) battery pack fully charged can provide up to 400 print cycles and/or 6 hours of completely operational running time.
How will the TS-3000i® affect the speed of my internet connection?
The TS-3000i® uses very small network data packets and should have no noticeable effect on your internet connection.
Do I need a special router?
No. You don't need a special router. The TS-3000i® simply needs to be connected to your local area network by using the Cat5 network cable included with your TS-3000i® TimeSync Web Clock. The TS-3000i® Units communicate through your local area network.
Do I need a special router for PoE support?
Yes. You will need a PoE-Enabled multi-service router for PoE support. The TS-3000i® with the PoE option simply needs to be connected to your local area network by using the network cable included with your TS-3000i® TimeSync Web Clock to receive all the operational power it needs.
Does ATVS Enterprise Software work with the TS-3000i®?
The ATVS Enterprise software will function the same way with the TS-3000i® as it does with the Amano PIX-3000xN and PIX-3000xNT clocks. The TS-3000i® can be auto discovered using Zeroconf, while the PIX-3000xNT will still utilize the Lantronix utility for discovery.
When using ATVS Enterprise software with the TS-3000i® clocks, software will take over control of the following functions at the clock so they will not be setup within the clock:
- Time server setup. As soon as software syncs the TS-3000i®, the Sync Type on the Time Sync Settings screen will automatically be changed to ATVS Software Sync.
- Time synchronization schedules (same schedules run on all clocks as the software is the master). The schedules in the TS-3000i® will not be used because the software is now the master for all time synchronization.
- All reporting (transactions, devices, schedules, and status). Software provides a master database.
- SNMP Trap setup for enhanced network monitoring.
- E-mail notification.
However, the following functions will still need to be setup at the clock if you do not want to just use the default settings:
- User Settings - log in name and password.
- Clock Settings - LCD display, and network settings for discovery.
- Clock Information - clock name and description. The clock name will be imported when the clock is added to the software.
- Print General Settings - all general print settings need to be defined.
- Print Lines 1 & 2 - Each clock could have its own print setup if desired, or just ignore and use default.
- DNS Server Settings - need to be modified if default settings are not acceptable.
The main reason to use ATVS Enterprise Software in conjunction with the TS-3000i® Automatic TimeSync Web Clock is to generate centralized reports and connection to the TS-3000i®. If the end user wishes not to load software on their server, then the TS-3000i® Utility CD can be used to generate transaction log data only for the clocks.
TS-3000i Literature
 TS-3000i Brochure
- TS-3000i Troubleshooting Guide
- TS-3000i White Paper
How to Reset Network Card:
Access "Reset Button" on Network Card
- Remove clock cover
- On back of clock, press blue button, to the right of led lights, for 2 seconds to reset network card.
If you do not have access to "Reset Button" on NIC Card
- Pull out black 2-pronged power cable from power outlet
- Wait 2 seconds, plug back in to reset NIC Card
Replacing the Ribbon:
Removal
- Remove the cover.
- Looking at the right hand side of the machine, pull the two catches upward. While holding the catches up, use your other hand to remove the ribbon.
Installation
- Insert the top of the ribbon first.
- Swing the lower portion of the ribbon into position.
- Turn the knob on the ribbon two or three times to reduce any slack in the ribbon.
- Replace the cover.
-
Pix3000xN(T) Literature
Pix3000xN(T)/ATVS Brochure - Pix3000xN(T)/ATVS Manual
Annual Hardware Support Contract Information
- Time Frame? 1 Year
- Loaner Units? Yes, On-site or mail-in service
- On-Site Repairs? Yes, local only
- Telephone/Remote Support? Yes, unlimited
- Included with TS-3000i Purchase? Yes
- Manufacturer Repair Cost Coverage? Yes
»Request a support contract for your TS-3000i here
Or call (718) 784-4900
Download Brochures/Manuals
- Brochures
- Manuals
Amano
Acroprint
Lathem
RapidPrint
Schlage/Ingersoll Rand
Amano Manuals
Acroprint Manuals
Lathem Manuals
Schlage/Ingersoll Rand Manuals
Time America Manuals
Guard Tour Manuals
Request A Repair

Thank you! We have received your message.
Request A Refurbished Unit
Thank you! We have received your message.
Request For Clock Parts

Thank you! We have received your message.